
This article considers the optimum gear list from two perspectives:
- Recommended gear to enable dynamic photographic shooting opportunities during day and night;
- Ultralight options to lighten the load when the desired photo is in a remote location and you don’t want to wear yourself out
For this article, I will approach building a gear list using Sony A7R3 mirrorless cameras as the primary camera solution, because that is what I own. The key with any gear list is building around the camera and lens requirements. Example is that the camera and lens weight is a key factor in picking a tripod. Especially when going ultralight to get to remote areas. This article isn’t aimed at covering all the landscape photographic conditions or situations, but on what most photographers might want with them on site in a typical landscape shooting setting in various weather conditions. It doesn’t mean that all this gear should go on each shooting event. It is expected a photographer will grab what is needed for the shooting conditions expected. It will address some personal gear that is useful for shooting outdoors in a variety of situations. This article will only cover gear and tools needed onsite. Planning and preparation tools as well as post processing tools will be covered in a different post. Drones aren’t part of that, as it would be considered under aerial photography.
So let’s get into the gear list.
A weather-sealed high dynamic range camera
Sort of a no brainer, but trying to get and use a weather-sealed camera will go a long way in protecting your investment. Making sure you select a camera with high dynamic range can reduce your bracketing requirements. The top Sony mirrorless cameras with the best dynamic range are the Sony A1 and the new Sony A7R V. An exceptional ultralight full size sensor option is the Sony A7C, which comes in at a mere 1 lb. 2.0 oz with battery and memory card. This is over a 1/2 lb lighter than the Sony A7R V and 3/4 lb. lighter than the Sony A1.
A Smartphone Camera
This is perhaps one of the most useful tool to use in scouting a sight or in considering your compositional layout. For scouting you not only record what the sight looks like, but you get the pinpoint GPS location and other EXIF to use in planning the shot. While onsite with your gear, using this tool to give an idea of what the composition might look like and help to identify distracting elements that you would want to remove. Of course the real extra value has to do with a Sony smartphone app that allows Sony camera users to remotely adjust camera settings and take pictures.
Lenses
Here is where the debate gets going on such issues as zoom verses prime lenses. I carry both, but mostly shoot with two zoom lenses and the prime. Here again, weather-sealed lenses should be a feature you look to have when seeking a new lens.
- 16-35mm F2.8 GM Zoom Lens is my primary wide angle lens.
- Sony FE 24-240mm F3.5-6.3 OSS Zoom Lens is my other most used lens that covers my medium to long distance ranges.
- Zeiss Batis 18mm F2.8 Prime Lens is my favorite lens for adding astro imaging.
Filters
This is another area where there is a lot of debate, which centers around use of UV filters and graduated neutral density filters. Then the other debate here focuses on screw on verses slide in and now they have added the drop in or rear filters that are added between the lens and camera. For the later, consider that option on ultra wide angle lenses that don’t provide a screw on treaded lens mount in the front. Outside of that, then the preference between slide in, magnetic or screw on is a mater of preference and what you are willing to carry in your pack. The key here is buying good quality cast neutral filters and filters with warranties. A went with the NiSi 100mm square filters are to match up with their smartphone app to use in determining camera settings and exposure times. My other recommendation when buying filters is to buy the speciality filters at the diameter that fits your widest lens and purchase step down rings to attach them to the smaller diameter lenses. So here is my list of filters.
- Breakthrough Filters X4 Neutral Density 3-Stop, 6-Stop, and 10 Stop
- Breakthrough Filters X4 Dark CPL 3-Stop and 6-Stop, which are a combined circle polarizing lens (CPL) filter with Neutral Density coating added to save stacking of filters.
- Breakthrough Filters X4 CPL is my circle polarizing lens (CPL) filter.
- NiSi 100mm Filter System‘s IR ND16 (1.2) 4 Stop, IR ND256 (2.4) 8 Stop, and IR ND1000 (3.0) 10 Stop
- NiSi 100mm to 150mm Nano IR GND (1.2) 4-Stop Horizon ND filter, which has a graduated band on either side of clear glass to only lower the overexposure issue on a sunset.
- NiSi Natural Night Filter (Light Pollution filter) to aid in night and astro photography
- B+W XS-Pro UV Haze MRC-Nano filter to absorb ultraviolet light and reduce bluish casting during daylight. Very useful on a hazy day.
- B+W T-PRO Clear Filter is on all my lenses to add protection to my lenses against the elements. Remove when using other filters.
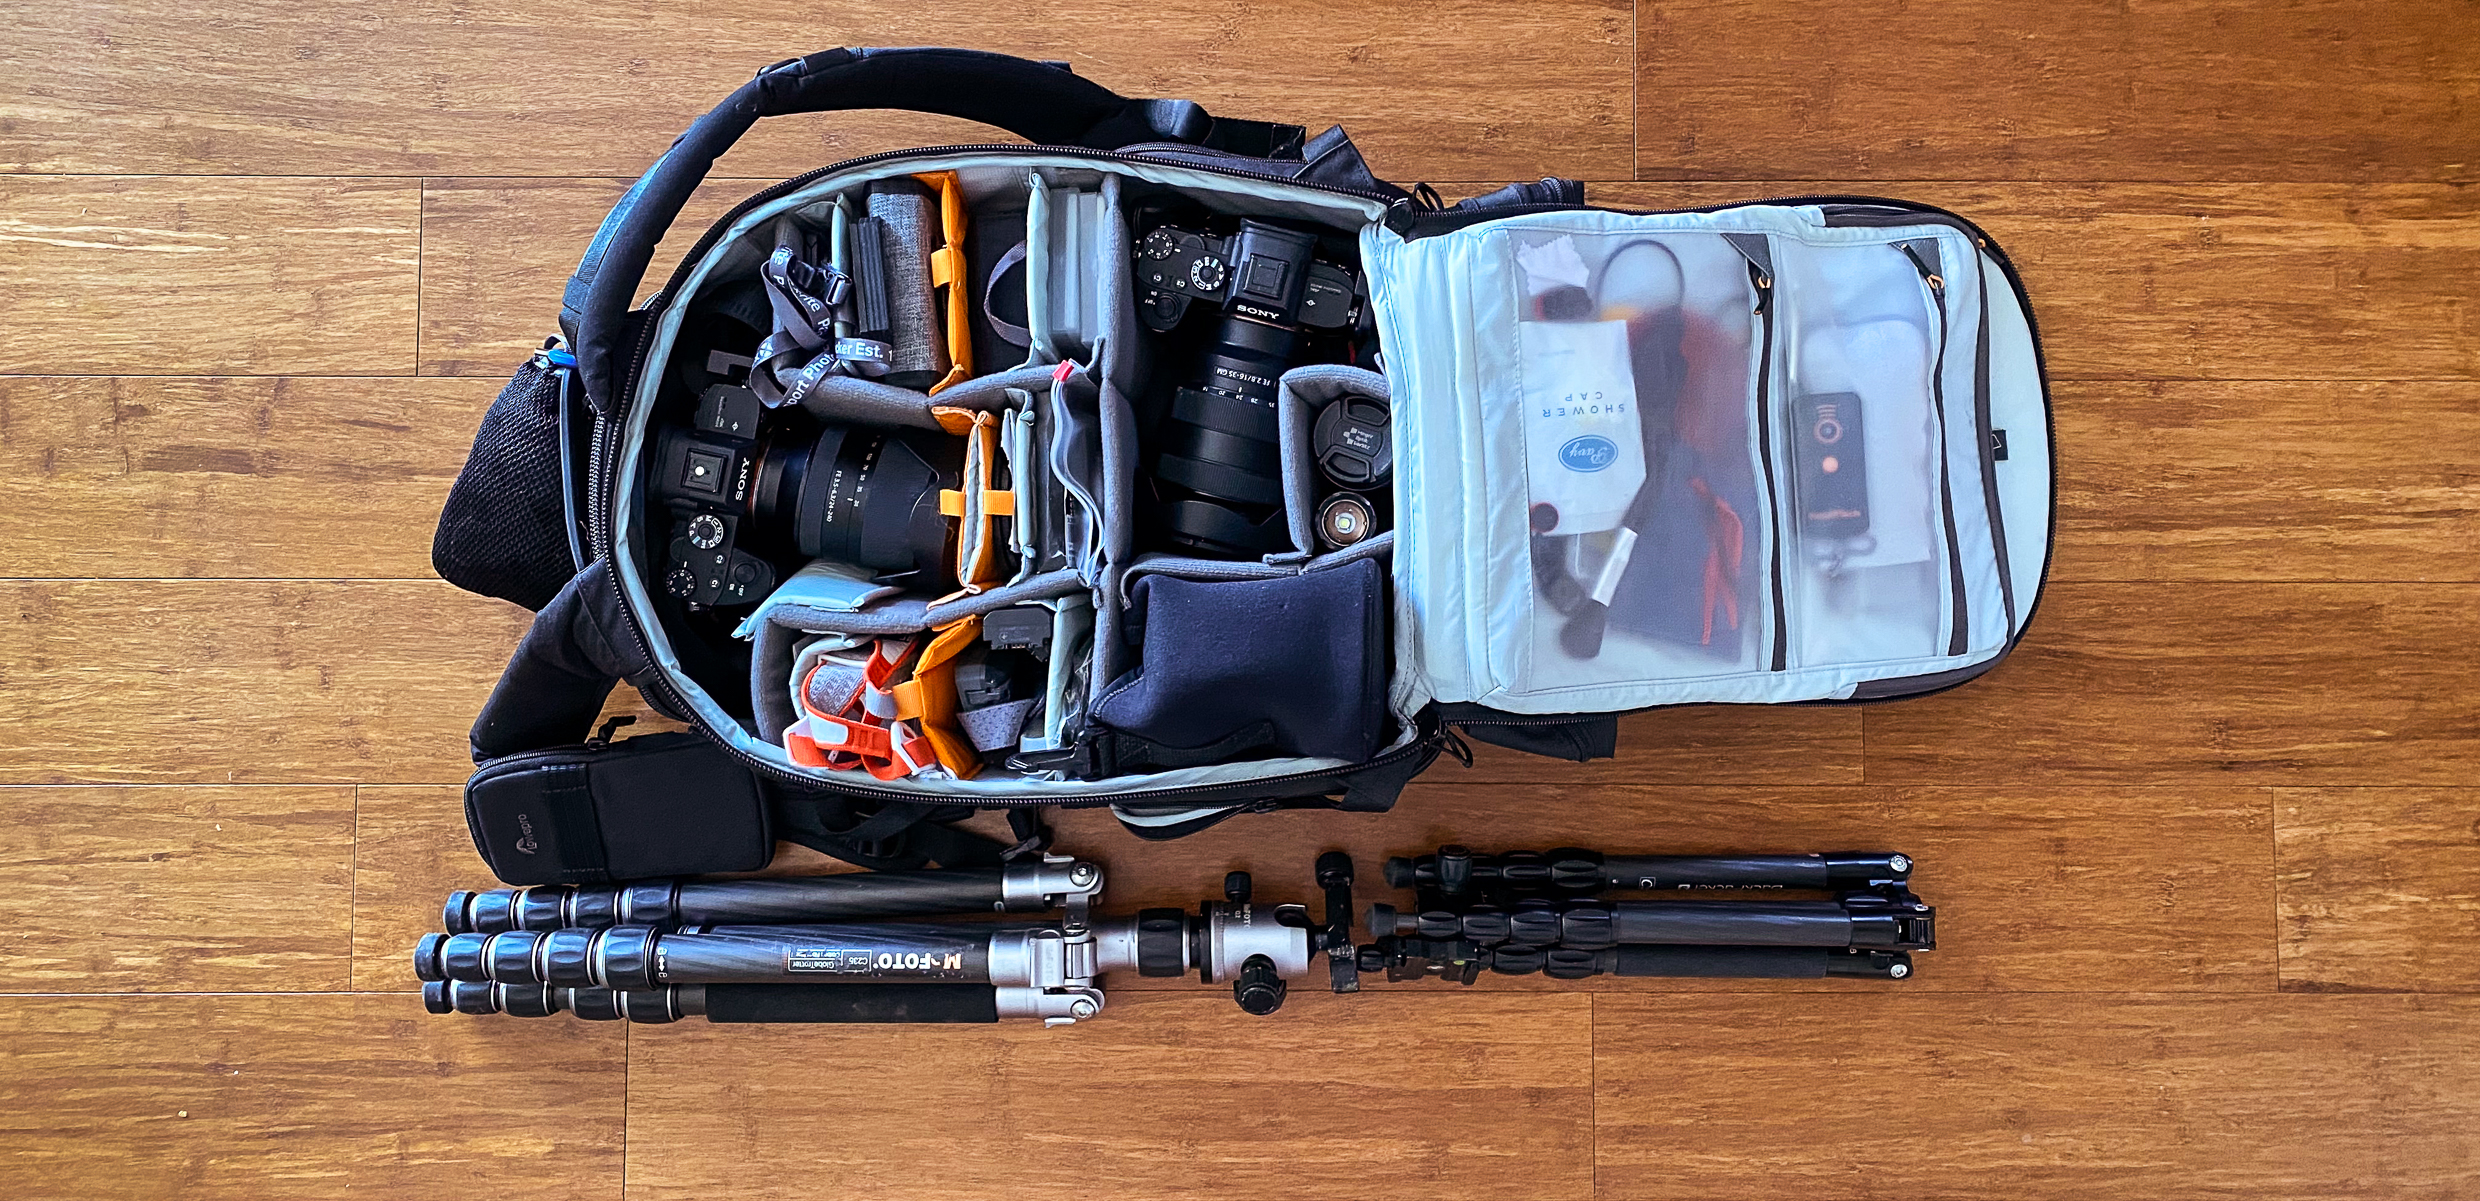
A Sturdy Tripod
In order to protection your camera investment, a sturdy tripod is needed. You might even consider having more than one tripod, like an ultralight one if you have to hike into the shooting location. You might even consider having a small table top one to use in getting low to the ground. In selecting any tripod, consider these additional needs:
- If you are hiking a lot, then go with the lightest tripod that is still stable for your camera, heaviest lens, and any other accessory like a gimbal you plan to attach.
- Determine if a center post tripod offers you the options needed to meet your shooting requirements.
- Select a tripod that offers you add-on spikes to help anchor to the legs firmly, like in a river bed with swift water.
- Twist leg locks or a flip lock.
- How many leg extensions are required.
- Ability to dismantle the tripod to clean it.
- Compactness to meet the airplane carryon luggage limit of 22 inches.
- Ability to detach a leg to become a monopod.
Tripod Head
Just as a sturdy tripod is a necessity, so is a functional solid tripod head. A ball head typically is the norm, but here are a few other features to consider:
- 360-degree panning with markings
- Does it use the Arca-Swiss Quick Release System
- Lever or twist release nob for the Quick-Release System
- A base leveler option
Camera L-Bracket
A truly convenient accessary that allows you to minimize tripod head reset as you alternate between landscape or portrait modes. You will need to select a bracket that matches your tripod head camera mount. I use the Really Right Stuff Modular Plate specifically designed for my Sony mirrorless camera.
Remotes and Shutter Releases
An essential item to avoid camera vibration when taking a photo or to aid in long exposures beyond the bulb mode. Features to choose from are wireless, wired, timer, or enhanced remote trigger options. These remote triggers offer additional capabilities to assist with: timelapses, startrails, HDR, sound triggers, laser beam break triggers, lightning triggers, droplet sensing triggers, smile detection triggers, and motion detection triggers. With the addition of Bluetooth and WiFi functionality added into cameras, several manufacturers offer smartphone apps. It is advisable to go out with at least a wired and wireless option that were both tested prior to heading out. Here are my options use:
- Sony’s Imaging Edge Mobile smartphone app is my primary remote trigger that offers additional functionality
- Sony’s RMT-DSLR2 Wireless Remote Commander is a wireless option useful with the video functionality
- Sony’s VPR1 Remote Control with Multi-Terminal Cable is a wired option that also offers zoom functionality
- MIOPS Smart+ Camera Trigger is a wired hot shoe that you control through a smartphone app
- Pluto Trigger is a wired hot shoe mounted device that you control through a smartphone app and has additional capabilities over the MIOPS Smart+ Camera Trigger
- Vello Wireless ShutterBoss III Remote Switch with Digital Timer is a wired hot shoe mounted intervalometer
- Revo VRS-MULTI-W Wireless Multi-Interface Remote is a specialized remote accessible from 348 feet away
Camera Bag or Carry Systems
An essential item needed to carry your gear is a bag. There is a lot of recommendations out there, but by far most photographers recommend a dedicated photography bag that can carry your gear comfortably. Here is a link that could be helpful in determining you carrying systems options. I employ several options. I am found of carrying my gear in a hiking bag that offers a back venting. The option depends on the distance, but if I am transporting my gear to a location, then you’ll see the specific camera bag listed below along with the two hiking bags I use.
- Lowepro ProTactic BP 450 AW II Camera and Laptop Backpack is my travel bag and storage bag
- Osprey Atmos AG 50 Pack is my hiking bag for overnight hiking trips
- Osprey Stratos 24 is my hiking bag for day hikes
Photography Accessories
Here is a listing of my supporting photographic accessories that I depend upon.
- Nodal Ninja Ultimate M1-L With RD16 II Rotator Panoramic Head is my turn to for pano situations
- Nodal Ninja EZ-Leveler-II used to lock in head level before mounting the Nodal Ninja
- Vello Low Profile Bubble Level that I keep to cover my hot shoe and help with camera leveling
- Mindshift Contact Sheet is a is a 5′ X 3.5′ found sheet that is always clipped to my bag
- Shower Cap picked up from stays at the hotel to use as a temporary camera cover.
- Camera batteries and battery charger
- Memory cards and a waterproof card case with key chain
- X-Rite ColorChecker Passport Photo 2 used to achieve proper exposure and color balance
- Peak Design Capture camera clip
- Peak Design Cuff to protect your camera from accidental drops
- Peak Design Shell to protect my camera from water, snow, dust and abrasion
- Sensei Step-Up Rings
- Microfiber Lens cloth, Lens Cleaning Wipes and Tiffen Lens Tissues
- Microfiber cleaning towels with a few always in the pack and some in the car
- VisibleDust Zee Pro Sensor-Cleaning Bulb Blower to blow dust off of sensor and lenses
- VisibleDust Arctic Butterfly 724S Super Brite Sensor Brush for sensor cleaning
- VisibleDust EZ Sensor Cleaning Kit for those worst case moments
- MindShift Gear Filter Nest Mini Filter Pouch to protect my screw on filters
- NiSi Clever Cleaner Filter Brush to help clean my NiSi square filters
- Raya 5-in-1 Collapsible Reflector Disc to use in supplementing light in shadowy areas
- Gaffers Tape is always in my pack to trips away from my car
- Silica Gel Moisture Packs to help absorb condensation from temperature changes
- 14″ x 20″ 2 Mil Clear Plastic Resealable Zip Poly Bags to place my camera in with moisture packs to slow down the warming process and minimize condensation following prolonged exposure in the cold
- Power Banks with a variety capabilities to use in the car and in the bag for emergency
Personal Gear
The following are useful personal gear that are worth considering to having available.
- Photography cold weather gloves with magnetic finger tips
- None tinted prescription glasses
- Boots and shoes to support getting to and wearing in harsh conditions
- Yaktrax Walkers Traction System to assist with traction on icy situations
- Fenix flashlights (PD35 & PD25) for light painting and use at night or low light conditions
- Petzl Reactik+ Headlamp which is Bluetooth Smart and allows me to control from my phone
- Outdoor Research Helium Rain Jacket is my go to rain jacket and for layering
- Mountain Hardwear Exposure/2 GORE-TEX PACLITE Stretch Pants to keep dry and layer for warmth
- Sunday Afternoons Ultra Adventure Hat for sun cover
- Kafka’s Kool Tie to help fight off heat related injury in extremely hot or humid climates
- Silver Shadow Carbon Trekking Umbrella to provide shade and shelter from rain
- Six Moon Designs Hands Free Umbrella Kit to attach my umbrella to my backpack shoulder strap
- Sea to Summit Mosquito Head Net with Insect Shield
- Thermacell MR300 Portable Mosquito Repeller for use at the shooting situation
- Sawyer Permethrin Pump Spray to protect your clothing
- Repel Lemon Eucalyptus Pump-Spray Insect Repellent
- Adventure Medical Kits Ultralight/Watertight .7 Medical Kit is always with me when I am hiking
- REI Co-op Flexlite Air Chair is an ultralight chair to deploy on site when you need to hang around to get the shot
- NEMO Chipper Reclaimed Closed-Cell Foam Seat Pad as my alternative chair or as a kneeling pad
- S.O.L. Survive Outdoors Longer S.O.L. 90% Reflective Emergency Blanket is always packed in on hikes
Besides relying on experience, credit goes to these additional web sources for reminders and inspiration in useful accessories that offer tremendous payoff. Since I am a Sony gear guy, this wonderful B&H video by Colby Brown is most helpful.
Websites referred to for this post are:
- B&H Explora’s article A Guide to Accessories for Landscape Photography by Bjorn Petersen
- Digital Photography School’s post 10 Essential Pieces of Landscape Photography Gear by Jeb Buchman
- Photographylife article Recommended Equipment for Landscape Photography by Spencer Cox
- Expert Photography article 25+ Must-Have Landscape Photography Accessories by Andrea Mini